How to Record with Focusrite Scarlett 2i2 3rd Gen | Step-by-Step Tutorial
Are you looking to record pristine audio with the Focusrite Scarlett 2i2 Third Generation? You’ve come to the right place! With this step-by-step tutorial, you’ll be able to gain insight into all of the features this incredible unit has to offer and get up and running in no time. Whether you’re a novice or veteran musician looking for reliable recording technology, you won’t want to miss out on what Focusrite’s powerful third generation interface can do for your sound. Get ready as we explore what makes this device so special – from setting it up properly all the way through capturing perfect recordings each and every take – there’s something here for everyone!
Want to see the latest guitar accessories that are popular right now? Just click here!

Understanding Focusrite Scarlett 2i2 3rd Gen
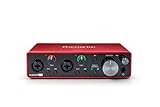
The Focusrite Scarlett 2i2 3rd Gen is a huge favorite among content creators, music producers, and professional sound engineers because of its excellent audio interface. It’s a go-to solution provided by Focusrite’s line of products for anyone who desires uncompromised, quality audio recording. The 2i2 model from the 3rd Gen Focusrite series boasts two inputs and two outputs, hence the 2i2. Equipped with two preamps and a user-friendly interface, this little beast simplifies the audio recording process tremendously. It doesn’t matter if you’re a beginner or a seasoned pro; the Scarlett 2i2 is customizable and can easily adapt to your working style.
One major draw of the Focusrite Scarlett 2i2 is its perfect blend of affordability and function. This unit doesn’t break the bank, but still delivers high-quality, professional-grade audio. But what sets the 3rd Gen Focusrite apart is the ‘Air’ feature: a button that, when activated, enhances the clarity and natural resonance of your audio. This feature is specifically designed to give your sound an open, ambient atmosphere.
Like the earlier generations, the 3rd Gen Scarlett 2i2 is designed to be rugged, with gleaming red all-metal casing. Aesthetics aren’t skimped on either, from the stunningly lit halos around the gain knobs to the sleek, professional look. Sounds like a dream? It most definitely is. However, to obtain the best from your 2i2 3rd gen unit, proper understanding and operation is key.
Recording with the Focusrite Scarlett 2i2 3rd Gen is pretty straightforward. After you’ve plugged in your mic or instrument, adjust the gain using the knob, and you’re good to go. The LED halo can help you set your levels right: green means good, red means it’s clipping. Press the ‘Air’ button if you want a brighter, more open sound.
Perhaps one key feature that sets the 3rd Gen apart from previous iterations is its improved AD/DA converters. This enhancement translates to clearer, more defined sound. Whether you’re recording a podcast, guitar sessions, or your vocals, you can be rest assured that the quality delivered by the Scarlett 2i2 3rd gen is top-notch yet remains accessible for all.
Always keep in mind the device’s capacity. Overloading the 2i2 could result in distortions or cracks in your output. Therefore, understanding your unit and working within its specifications contributes significantly to the outcome of your recording project. While recording may be straightforward, it’s the little adjustments and comprehension of your Focusrite Scarlett 2i2 3rd Gen’s capabilities that can make all the difference.
To wrap it up, the Focusrite Scarlett 2i2 3rd Gen is an affordable, accessible, and high-quality audio interface that caters to professionals and beginners alike. Its excellent preamp, immaculate build, and user-friendly interface, coupled with the unique ‘Air’ feature, sets it ahead in the game. Importantly, understanding how best to utilize its features and specifications is key to getting the best out of your 2i2 3rd Gen Focusrite unit.
The Core Features of the Scarlett 2i2
The core features of the Scarlett 2i2 audio interface are tailored to enhance the quality of your sound recording experience. The Scarlett 2i2 3rd Gen is undeniably a powerful tool in the world of sound production. Its outstanding features can transform your makeshift home studio into a professional setup, with compact and easy-to-use equipment.
Firstly, what sets the Scarlett 2i2 apart from other audio interfaces are its two of the best-performing Scarlett mic preamps the range has ever heard, now with Air, which can give your vocal and acoustic recordings a brighter, more open sound. Every Scarlett 2i2 3rd Gen interface comes with a whole host of recording software, enabling you to work in your preferred digital audio workspace.
Its high-performance 24-bit/192kHz AD-DA converters allow for a super-low latency. With this Scarlett interface, you can record and play back your audio in real-time – without the need for any additional digital-to-analogue processing. This is a huge advantage for musicians and sound engineers who need instant feedback during recording sessions.
Moreover, the Scarlett 2i2 is equipped with two balanced line inputs, perfect for connecting synthesizers, drum machines and other line-level sources. These are complemented by two balanced line outputs, which offer a clean and detailed signal for connecting to studio monitors. On top of these, there’s also a headphone output with dedicated volume control.
A standout feature of the Scarlett 2i2 is the quick start tool. It’s intuitive enough for beginners to grasp quickly, yet it doesn’t skimp on the depth that seasoned professionals desire. It’s uncomplicated but powerful, guiding you easily through the setup process and pointing you to software that you might find useful.
Using the Scarlett 2i2 is a simple process. Connect the interface to your MacBook or PC via USB. Once you’ve completed that, you can start to link up your microphones, guitars, and other sound-producing tools. Very swiftly, you’ll find yourself with a flexible and vibrant setup that’s ideal for recording your music. Also, with its unique gain halo meters, it’s pretty easy to keep an eye on your levels, ensuring your sound is clean and clear all through.
To sum it up, the Scarlett 2i2 3rd Gen audio interface is a fantastic piece of sound equipment. It’s a tool that won’t impose limitations on your creativity or your capability to produce excellent audio content. It’s robust, intuitive, and absolutely useful for novices and experts alike. If you’re considering diving into the world of recording, this interface will certainly provide a strong foundation for developing your skills. As you can see, the core features of the Scarlett 2i2 aren’t just a list of impressive specifications – they are a steadfast promise of exceptional audio quality and seamless sound production.
- Pro performance with great pre-amps – Achieve a brighter recording thanks to the high performing mic pre-amps of the Scarlett 3rd Gen. A switchable Air mode will add extra clarity to your acoustic instruments when recording with your 2i2 3rd Gen.
- Get the perfect guitar and vocal take with – With two high-headroom instrument inputs to plug in your guitar or bass so that they shine through. Capture your voice and instruments without any unwanted clipping or distortion thanks to our Gain Halos.
- Low-noise for crystal clear listening – 2 low-noise balanced outputs provide clean audio playback with 3rd Gen. Hear all the nuances of your tracks or music from Spotify, Apple & Amazon Music. Plug-in headphones for private listening in high-fidelity.
- Studio quality recording for your music & podcasts – Achieve pro sounding recordings with Scarlett 3rd Gen’s high-performance converters enabling you to record and mix at up to 24-bit/192kHz. Your recordings will retain all of their sonic qualities.
- Easy Start – It’s easier than ever to get up and running with your Scarlett 3rd Gen with our online tool, Easy Start. Whether you’re looking to record or playback audio, we will help you get started.
USB Connection in Focusrite Scarlett 2i2 for Versatile Use
Let’s dig a little deeper into the usability of the Focusrite Scarlett 2i2, specifically the key aspect that makes it versatile – The USB connection. The Focusrite Scarlett 2i2 3rd Gen is an outstanding piece of equipment, and the USB interface plays a significant role in enhancing its versatility. The core features of the Scarlett 2i2 make it a tremendous asset, but its functionality exceeds a lot more due to the presence of the USB.
The Focusrite Scarlett 2i2 USB acts as the primary connection mode, which allows for an easy link to your computer or other digital devices. It’s thanks to this USB feature, that you can enjoy recording clear, high-quality sound directly into your device without needing any additional hardware. This feature is fairly standard these days, but it’s the execution by the Focusrite Scarlett 2i2 that will leave you genuinely impressed.
Sporting a USB-C port, the Scarlett 2i2 is future-proofed and well-equipped to offer you high-speed data transfers. The Focusrite Scarlett 2i2 USB enhances the performance of this audio interface, making it ideal for home studios and professional setups alike. It draws power directly from your computer which eliminates the need for an external power supply. Undeniably, the USB connection elevates the Focusrite Scarlett 2i2’s versatility and increases its convenience to its users.
Digging deeper, we find that the use of USB-C over traditional USB poses not only a future-proof solution but also provides a more robust and stable connection. This is essential when dealing with high-quality audio data to eliminate or significantly reduce latency and playback issues.
Another notable feature the Focusrite Scarlett 2i2 offers, due to the USB connection, is its plug and play capability. This means you can connect this device to your computer using a USB cable and start using it straight away. There’s no need for any complex configurations or installation procedures. This is particularly beneficial for beginners who are not too tech-savvy since setting up the Scarlett 2i2 is shockingly easy. Simply plug in your instruments or microphone and connect the USB cable from the Scarlett 2i2 to your computer.
Overall, the Focusrite Scarlett, with its 2i2 USB connection, provides a versatile, reliable, and quality sound recording solution for both professional and amateur users alike. The ease of use, the clarity of sound, and the flexibility to use it with a range of digital devices, complemented by the high-quality build, make it an unbeatable choice amongst the array of audio interfaces available in the market today. So, whether you’re an aspiring singer, a professional musician, a producer, or a podcaster- the Focusrite Scarlett 2i2 with its versatile USB functionality would turn out to be a rewarding acquisition on your part.
Setting Up the Focusrite Scarlett 2i2 in Your Studio
Setting up your Focusrite Scarlett 2i2 in your studio is a process that should be undertaken with care to ensure optimal functioning and performance. This step-by-step tutorial offers comprehensive insights into how you can easily integrate the Focusrite Scarlett 2i2 3rd Gen into your studio range and start recording quality tracks like a pro.
The first thing you need is to identify a suitable location in your studio to place your Focusrite’s Scarlett 2i2. You’ll need a location that’s easily accessible and free from excessive vibrations or ambient noise. You wouldn’t want anything to hamper the crisp, clean output that the Scarlett 2i2 is acclaimed for in the studio range.
Once you’ve found a suitable location, it’s time to start connecting the Scarlett 2i2 to your studio’s sound systems. This might sound complicated, but the 2i2 actually comes with a handy set of tools to make the setup process a breeze. These tools include various ports and cables that allow you to connect the 2i2 to your studio’s main mixer, monitors, microphones, and other essential recording tools.
Take note of the USB connection on the Focusrite Scarlett 2i2. This connection is versatile use at its peak. It allows for seamless integration with your computer system and other digital devices. As part of the greater range of connectivity options, the USB interface can really help streamline your recording and mixing processes.
Now, it’s time to install the software that comes with the Focusrite Scarlett 2i2. The 2i2 is part of Focusrite’s range that comes with an impressive suite of software tools. The installation process is straightforward and, once complete, these tools will provide you with a wealth of features and options to create and tweak your recordings right from your desktop or laptop.
Beyond the setup, there’s also regular maintenance to keep in mind. To maintain your Scarlett 2i2 in excellent working condition, perform routine check-ups and clean-ups. Keep the device free of dust, make sure its cables are all in good condition and regularly update its software tools. This ensures that your 2i2 stays efficient, preserving its place as a top contender in your studio’s range of recording equipment.
Moving forward, you’ll begin to appreciate the ease and convenience that come with owning a Focusrite Scarlett 2i2. It’s also no surprise to anyone that with some time and practice, you will master the ins and outs of this extraordinary piece of hardware and its software tools. Whether you’re recording a simple vocal track or a full-blown orchestral piece, the Scarlett 2i2 will always deliver.
Ultimately, setting up your focusrite’s Scarlett 2i2 in your studio may initially seem like a daunting task. But with the right tools and a clear understanding of your Scarlett 2i2, you’ll find that it’s actually a surprisingly straightforward and rewarding process. With your 2i2 ready to roll, your studio range is now notably bolstered, offering you greater versatility and an improved recording experience.
Integrating Scarlett 2i2 with Your Studio’s Audio System
Integrating your Scarlett 2i2 with your studio’s audio system is an essential step in maximizing the potential of your recording studio. The Focusrite Scarlett 2i2 3rd Gen, also known as the Scarlett 2i2, offers a robust combination of compactness and superior audio quality which bolsters your studio’s sound system.
The Scarlett 2i2 functions as both an audio interface and as a vital piece of your studio’s overall audio system. As an audio interface, it takes the sounds that you make and translates them into digital code, so your software can interpret and manipulate them. Conversely, it also translates the digital code back into sound waves your studio’s speakers can emit, completing the overall audio loop in your studio.
The process of integrating the Scarlett 2i2 with your studio’s audio system is fairly straightforward, but it’s important to follow some key directions. To get the most out of your Scarlett 2i2, you’ll want to ensure it’s set up correctly within your studio’s audio system. Placement is key; the Scarlett 2i2 should be in a central location where it has easy access both to the instruments producing sound and the studio’s speakers.
Next, it’s necessary to install the proper software. This device comes bundled with a goodly amount of digital audio workstation (DAW) software and plugins, thus making the overall integration process all more seamless. As for the software, the Scarlett 2i2 functions well across a range of platforms, and is known for being easily compatible with various systems. To start with, there’s the bundled Ableton Live Lite and Pro Tools First, plenty enough to get some solid work done. Additionally, the Scarlett 2i2 comes with a suite of professional software and plugins, most notably ‘Focusrite Control’. This software allows you to manage your studio’s audio path, choosing what you listen through your monitors and headphones.
Finally, it’s vital to understand your studio’s system to effectively embed the Scarlett 2i2 within it. If your studio utilizes a larger or multi-room system, you may want to consider incorporating additional Scarlett 2i2 units to ensure optimal audio coverage. However, for most basic single-room studios, a single Scarlett 2i2 should suffice.
Overall, when integrating the Scarlett 2i2 within your studio’s audio system, you can expect a boost in the efficiency and the sound quality of your studio. As long as you follow the directions, place it properly, and use the right software, the Scarlett 2i2 should serve as the backbone of your studio’s audio capabilities.
Remember, every great music recording starts somewhere, and no matter how simplified or complex your studio set-up might be, the Scarlett 2i2 is undeniably a fundamental staple in today’s audio world that will certainly uplift your studio’s system.
Smart Tips for Recording with Focusrite Scarlett 2i2 3rd Gen
Now that you’ve understood the core features of the focusrite scarlett 2i2, we’re going to delve into some smart tips for recording with this versatile piece of equipment. The gen, or 3rd generation, of the 2i2 comes jam-packed with enhancements, making it an essential piece of your studio setup.
The first tip for making the most of recording with focusrite’s Scarlett 2i2 is setting everything up correctly. Ensure that the 2i2 is properly integrated into your studio’s audio system. Remember, the Scarlett 2i2 uses a USB connection, supplying your setup with flexibility and portability. Take advantage of these facilities to widen your recording possibilities.
Before launching into recording, Run a test session to confirm your setup. This handy tip can save you a lot of troubleshooting later and give you peace of mind that all systems are fully functioning. When testing, remember to experiment with different gain levels on your Scarlett 2i2. The gen version features padded inputs, effectively tackling loud sources so you can record without worrying about distortion.
It’s also recommended when recording with the focusrite Scarlett 2i2 to utilize the direct monitoring function. This key feature allows you to hear your input in real-time, free from latency issues. You can enable it by pressing the ‘direct monitor’ button at the front of the 2i2. Learning to work with this function is an integral part of developing a competent recording technique.
A smart use of the Scarlett’s ‘Air Mode’ feature can add a breath of fresh air to your recordings. It emulates the characteristics of focusrite’s original ISA preamp, giving your recordings a brighter and more open sound. Experiment with it depending on your recording needs; this feature does wonders for vocal tracks.
Bearing in mind that focusrite’s Scarlett 2i2 is a 2-in/2-out interface, balance your input wisely. The gen variant comes with high-performance converters capable of capturing your performances with superior clarity. Therefore, manage your microphone and instrumental inputs to optimize your audio outcome. Ensuring that your studio’s audio system is harmonized with the 2i2 will make the most of these high-end features.
Finally, a smart tip to remember when recording with your Scarlett 2i2 gen is the importance of keeping your drivers and software up-to-date. Focusrite periodically releases updates to improve functionality and implement new features. It’s a tip not to overlook; staying up-to-date ensures the smooth operation of your 2i2 during recording sessions.
Hopefully, these smart tips have given you a deeper insight into recording with focusrite’s Scarlett 2i2 3rd gen. It’s a robust and handy piece of gear, offering you all the tools necessary for quality recording. Remember: setting up correctly, using your available features wisely, and staying updated with the latest software are all key to successful recording experiences with your Scarlett 2i2.
Enhancing Audio Quality with Scarlett 2i2
When you’ve got a firm understanding of the Focusrite Scarlett 2i2 3rd Gen, have the core features down to a tee, have your USB connections well-versed for versatile use, have incorporated it into your studio setup, and feel equipped with smart recording tips; it’s time to delve into the realm of enhancing audio quality with the Scarlett 2i2. Renowned for its dreamy audio quality enhancement capabilities, the Scarlett 2i2 can elevate your record quality to unprecedented heights.
The Scarlett, with its robust build and reliable performance, focuses not just on functionality but also on delivering superior audio quality. But how does it achieve such excellent audio quality, you may ask? It’s quite straightforward – the Scarlett 2i2 harnesses the power of its high-performance converters. These convert the audio signal from analogue to digital, and vice versa, at a high sample rate and with reduced noise. This operation enhances every minute detail of your audio, making it crisp, clear, and vibrant.
At the heart of this Scarlett’s prowess lies its preamps. They’re renowned for their transparent, low-noise, and low-distortion performance. With the 3rd Gen’s upgraded Air mode, the Scarlett 2i2 can reproduce the input impedance, clarity and frequency response curve of the original Scarlett mic preamp. This results in a brighter, more open sound that captures every nuance of your performance in incredible detail.
The USB connection in Focusrite Scarlett allows for easy integration and adaptability with various devices, but it goes beyond just the ease of connectivity. The USB connection also plays a pivotal role in enhancing audio quality. This is because the Scarlett 2i2 supports USB 2.0 and is compatible with USB 3.0 and USB-C, allowing for super-speed data transfer and seamless audio streaming with minimal latency.
But the Scarlett 2i2 isn’t just about crisp audio and effective sound transmission; its capabilities extend to its distinct Direct Monitor feature for real-time audio monitoring, which is essential for fine-tuning your performance and enhancing audio quality.
Another remarkable feature to consider in the Scarlett 2i2’s audio quality enhancement package is its high-headroom instrument input. This caters especially for hot pickups, preventing unwanted clipping and ensuring clean, artefact-free recording from guitars.
A built-in one-knob pad, decreasing the input sensitivity to allow for high-level recording without distortion, seals the deal in optimizing audio quality. Couple all these features with Pro Tools First – Focusrite Creative Pack and you have an enviable audio enhancement toolkit at your disposal.
In conclusion, when you’re recording with the Scarlett 2i2 3rd Gen, you’re not just recording with a highly intelligent audio interface, but also a reliable tool for audio quality enhancement. It’s your ticket to fine, superior quality audio that etches every performance with precision and brilliance.
Accessories to Optimize Your Scarlett 2i2 Experience
Optimizing your recording experience with the Scarlett 2i2 isn’t just about understanding its core features or integrating it with your studio’s audio system. One crucial aspect lies in selecting suitable accessories that’ll take your Scarlett 2i2 experience to another level. When paired with the right accessories, your Scarlett 2i2 can deliver astounding sound quality, and recording becomes a breezy, rewarding task.
Firstly, a good pair of studio monitors is indispensable for your Scarlett 2i2 setup. The monitor’s role is crucial as it lets you hear exactly what you’re recording, enabling you to make precise adjustments and ensure optimal sound quality. A quality monitor minimizes distortion, providing an accurate representation of your audio—an essential aspect of achieving a professional-sounding mix.
Next, you’ll want to consider acquiring a solid preamp or ‘amp’ for short. For those not up to speed yet, an amp essentially amplifies the signal from your Scarlett 2i2, amplifying your studio’s audio system capabilities. An amplifier with ample gain and minimal distortion can enhance the Scarlett 2i2’s sound output, making it sound even more remarkable.
When you’re recording with your Scarlett 2i2, keeping ambient noise to a minimum is crucial. Noise from your surroundings can creep into your recordings, ruining their clarity. A reliable set of isolation pads can combat these issues, optimizing your recording experience.
Another must-have accessory for your Scarlett 2i2 is a quality microphone. You’ll need a robust and sensitive microphone that can capture your voice or instrument with maximum detail. Many microphones on the market are designed with Scarlett 2i2 in mind, offering a seamless connection and compatibility.
You can also look into investing in studio-grade headphones. They can give you a more intimate listening experience, especially when mixing. Coupled with the Scarlett 2i2, you’ll be able to pinpoint every detail and nuance in your recording, fine-tuning it to perfection.
Finally, a sturdy, reliable USB cable for connection is worth investing in. Since the Scarlett 2i2 utilizes a USB connection for versatile use, a superior USB cable ensures stable, uninterrupted data transmission, reducing the risk of glitches or drops in your recordings.
All in all, these accessories serve to enhance and optimize your Scarlett 2i2 recording experience. The ideal mix of these accessories will depend on your unique studio setup and personal preferences. However, each one plays a significant role in making the Scarlett 2i2 the robust and versatile instrument it is. It’s not just about setting up your Scarlett 2i2 in your studio; it’s about optimizing every aspect of your recording experience. These accessories make that possible, unveiling the full potential of your Scarlett 2i2.
Finding Compatible USB Accessories for Your Scarlett 2i2 Setup
The Scarlett 2i2 3rd Gen by Focusrite is a phenomenal tool for your recording needs. Yet, to make the most of it, you’ll need compatible USB accessories for your Scarlett 2i2 setup. Ensuring compatibility with your Scarlett setup is key and involves some tool-specific knowledge. Finding the right USB tools isn’t just imperative for flawless recordings, it also optimizes your overall experience with Scarlett 2i2.
Scarlett, in its 2i2 3rd Gen model, offers remarkable usability via its USB port. The USB connection incorporated in the Scarlett 2i2 gives it a versatile touch for different recording circumstances. So, what sequential steps should you follow to ensure your USB accessories align perfectly with your Scarlett 2i2 setup?
USB cables are the primary accessory for the Scarlett 2i2, but remember that not all USB cables are compatible with Scarlett. One aspect you’ve dwell into is finding a USB cable of the right length. You don’t want the cables causing hassle during your recording session. Therefore, always check the compatibility of the USB cables with your Scarlett 2i2 to make sure your setup is as smooth and hassle-free as possible.
Another crucial USB tool for your Scarlett 2i2 setup are USB hubs. These accessories should not be overlooked, especially if you are dealing with multiple USB connections. A powered USB hub can be handy when you’re working with a Scarlett 2i2 setup spread across a wide studio. It enhances the mobility within your studio setup and facilitates better audio management.
Keep in mind that the compatibility and quality of the USB accessories can directly impact the audio quality when recording with the Scarlett 2i2 3rd Gen. For instance, a high-quality USB cable can significantly enhance the audio signals leading to clearer and more distinct sounds.
Furthermore, tools like USB audio interfaces complement your Scarlett 2i2 setup immensely. This accessory can increase the number of available inputs and outputs, making your Scarlett 2i2 more productive. This allows you to introduce more musical instruments or microphones into your recording process, making your sound richer and your setup more diverse.
In essence, USB accessories form a cornerstone of your Scarlett 2i2 setup. From cables to hubs and interfaces, these tools are integral to harness the full recording power of your Scarlett 2i2. Whether it’s enhancing audio quality or ensuring seamless integration with your studio system, the right USB accessories are the perfect accompaniment to your Scarlett 2i2 for an optimal recording experience.
So, to wrap it up, the Scarlett 2i2 thrives when paired with suitable USB accessories. Make sure to invest some time in researching and acquiring the correct tools to enrich your Scarlett 2i2 setup. It is the surefire way of getting the best sound production, providing an all-rounded, supreme quality recording experience with your Scarlett 2i2 3rd Gen.
Conclusion
Writing and recording your music, no matter what platform you use, is a great way to express yourself. You will likely run into a few bumps on the road but don’t let that stop you from achieving your goals! With our step-by-step guide, we hope it was easier for you to get familiar with recording on the Focusrite Scarlett 2i2 3rd Gen. Now that you’ve completed the tutorial, take a moment to listen back to how it sounds. Make sure each track is balanced and you adjust levels if needed. Recording can be intimidating at first but once you get comfortable with the mixers settings and positioning of your mics, the process goes much smoother! We believe everyone has the potential to create stunningly beautiful music – so don’t forget to unleash your creative spirit. Go ahead and show off your musical talents in no time!


Before I can commit to buying I need to know the following:
If I buy the Focusrite 2i2 Studio which include the Lite DAW will I be able to listen to one track and then simultaneously record on the next?
Example: I have made a backing track and loaded it in the DAW as Track 1. Whilst playing it back and listening to it via the headphone I would like to record my singing voice on Track 2.
By the way this will all be for private use.